
Powder Bathroom Renovation Plans
Related blog posts:
–POWDER BATHROOM VANITY ROUNDUP
–POWDER ROOM
Today is the day I can share the final moodboard for my down and dirty powder room makeover! I only have one small decision to make in regards to trim, but the rest of materials and fixtures have been ordered and are on their way!

This tiny bathroom has been an afterthought for a better part of the past 5 years, although it gets used dozens of times daily! For reference, it sits in the hallway once you enter our home from the garage and directly across from our laundry room.

The most attention I have given it involved my 2014 obsession with teal. We had just moved to Wisconsin from the beach and I think it was a coping mechanism for dealing with subzero weather… maybe?
The biggest function issue for this bathroom is the size of the bathroom itself and how the door from the hallway opens into it. There is a bit of dancing around the door in order to even close it. Add in toddlers that constantly want you to come join them in the potty room and this space feels pretty tight pretty quick.

My idea is to build a simple barn door that slides right. I desperately wanted a pocket door here and was willing to do the extra framing that it would require, but the layout just won’t allow it. I shared this plan over on Instagram and was flooded with concerns regarding sound “privacy”. I hear you! This bathroom entrance really doesn’t open up to any used spaces so it’s not that big of a concern, but I am working on a few solutions to help with the normal issue that comes with barn doors providing a tight close.
The next big decision I debated was replacing the tile. I even went as far as to pick out the tile I would use so that I could eventually bring it into the laundry room to tie this area together. Knowing I “can” replace this tile if needed, I chose to use it as a test room for painting my 1990’s rust textured tile. Turns out, I really like it… maybe not #1 choice kinda like it, but it’s infinitely better that it was. It is 100% giving me the confirmation I needed to tackle the rest of it that runs through my hallways. Tutorial coming soon!

My starting point in regards to fixtures and finishes was the vanity that I scored for $149 during Black Friday. Unfortunately, it must have been a single run, because I cannot find any evidence of it online anywhere. I included a version of it in the mood board, but it’s not exact.

I also had already decided that I would be using the leftover shiplap from the entryway. I searched vertical shiplap to find some inspiration and found this lovely image from Emily Henderson.
Done and done. The rest came together a little slower after I mixed and matched and dragged different finishes in and out of my visual mood board.
Budget
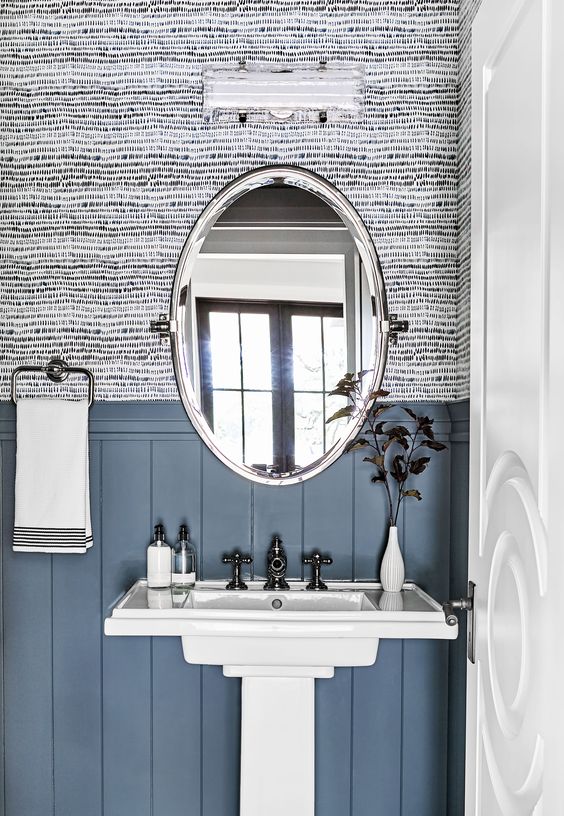
The main goal for me other than to make this beautiful and functional involved staying under $1000 for the entire project. Keeping the floor is definitely helping with this goal… two thumbs up for chalk paint! Everything I’ve chosen is extremely budget-friendly, although I did choose to splurge for this walnut mirror from Rejuvenation. They are having their 30% bath sale right now so my price ended up being $223… not crazy, but not necessarily inexpensive either. It also is allowing me to mix metals a little easier. I always worry about putting brass from 2 different sources next to each other because they will never be the same. The mirror will not only bring some warmth and contrast but is a good divider from the finishes on the vanity vs the light. Chris Loves Julia used a different version of this mirror in their recent bathroom makeover and I fell instantly in love with it.
via //
The Details
Mood boards definitely are a must to help me put the pieces together and make the bigger decisions, but some of the details will happen as I go. How high will I install the shiplap? Will I replace the baseboard vent cover? Where should I hang the art? Will I use brackets or should I try my hand at some floating wood shelves behind the toilet? Where will I store the toilet paper? All of these will come together, they always do. Thanks for following along with this makeover. If you want to see some of the other images that inspired this makeover, head over to my Pinterest board!

- vanity light
- artwork – minted
- artwork – juniper print shop
- new baseboards
- faucet
- mirror
- wallpaper
- towel ring
- vanity hardware
- outlet covers
- paint color – Clare
- vanity (similar)
- toilet paper holder
- paint color – Clare
What do you think? Do you have a bathroom renovation coming up? I hope this inspired you to start planning and gave you some good ideas for some budget-friendly fixtures that will take your makeover to the next level. I’ll be documenting the whole process over on Instagram if you want to follow along!

Love this! What program do you use for mood boards?
I use Adobe illustrator!
Loving all of the design aspects you’ve put into the design board! And excited to see what you think of Clare paint! I recently tried it and loved it!
Thank you so much. Yes I love it! The coverage is so good!
Hi! Could you share where you purchased the original vanity please?
Hi! I bought it at home depot during black friday. I don’t think it is still available but I linked a similar one in a different post – “powder bath vanity roundup”!